Oops, I did it again, another video tutorial. I'm being a goof in this one but hope you like :) Yes, I still wear scrunchies. I realize they're not cool, but alas, I don't care. I can't STAND hair in my face!!
Enjoy!

The Hesitant Homeschooler....Mama's Little Monkeys
Showing posts with label impatient crafter. Show all posts
Showing posts with label impatient crafter. Show all posts
Friday, January 14, 2011


Monday, December 13, 2010
Impatient Craftaholic Series--Non Skid Socks
Hey gang! This one is UBER easy.
Know those nifty socks you see for sale for kids that have the little non skid things so your toddler doesn't slip and bust his teeth as he's careening through the house? Well they're cute but something you CAN make yourself.
MATERIALS NEEDED:
Puffy Fabric Paint (found at just about any big box store, craft store or online. I happened to have Tulip brand on hand)
Toddler/Kids socks
Work Surface

HOW TO:
Lay your socks so the bottom of the sock is flat on your work surface so you can easily draw with your puffy paint. (excuse my dirty socks, I just used existing socks!)
Then just dot and draw whatever you want on the bottom of your socks!


Let the paint dry 24 hours or so and that's it! Follow the instructions on the paint for washing and drying, but generally they suggest turning the item inside out when washing and drying.
Then let your child loose on a tile floor and let them run like crazy....with less slip ups!
~~~Amy
Know those nifty socks you see for sale for kids that have the little non skid things so your toddler doesn't slip and bust his teeth as he's careening through the house? Well they're cute but something you CAN make yourself.
MATERIALS NEEDED:
Puffy Fabric Paint (found at just about any big box store, craft store or online. I happened to have Tulip brand on hand)
Toddler/Kids socks
Work Surface

HOW TO:
Lay your socks so the bottom of the sock is flat on your work surface so you can easily draw with your puffy paint. (excuse my dirty socks, I just used existing socks!)
Then just dot and draw whatever you want on the bottom of your socks!


Let the paint dry 24 hours or so and that's it! Follow the instructions on the paint for washing and drying, but generally they suggest turning the item inside out when washing and drying.
Then let your child loose on a tile floor and let them run like crazy....with less slip ups!
~~~Amy
Monday, October 11, 2010
Impatient Craftaholic Series---Upcycle Baby Shirt Pillows
Helloooooooooo I'm back! It's time for another Impatient Craftaholic tutorial! This is a super fast craft for anyone with even simple sewing skills!
Let's make this little fella!

MATERIALS:
Old baby/kids shirt or onesie.
Sewing Machine (not required)
Thread (coordinating or contrasting the neck hem color)
Hand Sewing Needle
Scissors
Fiberfill
(Helpful links are found within the steps.)
Step One:
Lay out your shirt on your cutting mat. If it's a onesie, you can cut a straight cut at the bottom of the shirt to open the onesie snap seam. Smooth and flatten the shirt so you can line it up as you wish.

Step Two:
Turn the shirt inside out and again smooth it so the design is centered (if you'd like). Pin along the bottom seam so you can keep things even. Don't be frightened if the fabric is a stretchy knit. Tips for sewing knits at the bottom.

Step Three:
Straight stitch (or serge if you have a serger) along the bottom seam. Since this is a finished piece of clothing, you can use the hem stitches already there as a guide if you'd like!


Step Six:
Head for the stuffing!! I love Morning Glory Polyester Fiberfill, but you can use whichever you like.


TIPS FOR SEWING KNITS:
The good thing about this pillow is it doesn't need to be perfect! When sewing with knits here are some tips:
*Pin or clip frequently.
*Use a microtex or ball point needle
*Use a walking foot if the fabric is really thick.
Enjoy!! Feel free to share this tutorial!
~~Amy
Let's make this little fella!

MATERIALS:
Old baby/kids shirt or onesie.
Sewing Machine (not required)
Thread (coordinating or contrasting the neck hem color)
Hand Sewing Needle
Scissors
Fiberfill
(Helpful links are found within the steps.)
Step One:
Lay out your shirt on your cutting mat. If it's a onesie, you can cut a straight cut at the bottom of the shirt to open the onesie snap seam. Smooth and flatten the shirt so you can line it up as you wish.

Step Two:
Turn the shirt inside out and again smooth it so the design is centered (if you'd like). Pin along the bottom seam so you can keep things even. Don't be frightened if the fabric is a stretchy knit. Tips for sewing knits at the bottom.

Step Three:
Straight stitch (or serge if you have a serger) along the bottom seam. Since this is a finished piece of clothing, you can use the hem stitches already there as a guide if you'd like!

Step Four:
Sew a straight stitch (or serge) along the open ends of the sleeves. You are sewing up all openings EXCEPT the neck. So now you have an inside out, nearly sewn up pillow!

Step Five:
Flip your shirt right side out and push out your corners and seams.

Step Six:
Head for the stuffing!! I love Morning Glory Polyester Fiberfill, but you can use whichever you like.

Begin stuffing the shirt through the open neckhole.

Step Seven:
Continue stuffing the "body" of the shirt with fiberfill, filling to the size you want...whether you want a thin vs. thick pillow. Be sure to sort of fluff the fiberfill before you shove it in the shirt or it will bind up and make little balls. Stuff and fluff to the desired size of your pillow. Be sure to stuff the little arms too!


Step Eight:
So now you have a stuffed pillow with an open neckhole. Here is where you need to hand sew the opening closed. Thread your needle. Hand sew your neckhole, shoving the fiberfill in so it doesn't catch in the needle and thread as you sew. You can grasp the neckhole closed with your hand, or by pinning it. The type of stitch you use is up to you. I used a blanket stitch. You can find more stitches here.
I used a contrasting thread that matched the body of the shirt but added some color to the neckhole. You choose your thread!

That's it, you're done!! You've just sewn a baby shirt pillow in no time flat! Even with hand sewing and stuffing I made this pillow in less than 30 minutes!
This pillow was a onesie with long sleeves! I cut off the longer sleeves and cut a straight line at the bottom for my hem!

TIPS FOR SEWING KNITS:
The good thing about this pillow is it doesn't need to be perfect! When sewing with knits here are some tips:
*Pin or clip frequently.
*Use a microtex or ball point needle
*Use a walking foot if the fabric is really thick.
Enjoy!! Feel free to share this tutorial!
~~Amy
Monday, July 12, 2010
Beau Beau (rice therapy bag) Tutorial-- Impatient Craftaholic Series
I hope you're enjoying my little tutorials! I'm no tutorial expert, but my main goal is to make the handmade life easier for everyone! If I can create, anyone can!!
This tutorial is for my Beau Beau Bags, also called Boo Boo Bags, Rice Packs, rIce packs, ouch pouches and a gazillion other names. Basically it's a bag you use on ouches. This is for your traditional square rice pack, you can make them in a variety of shapes and sizes. Larger ones can be made for headaches of menstrual cramps.
Materials Needed:
*Fabric, you're cutting a square of your choice size, so you want at least a fat quarter to get a typical size bag, your choice flannel or fabric, even terry cloth or minky might be nice.
*Rotary Cutter or Scissors
*YardStick or Cutting Guide
*Sewing machine, Thread, needle, usual machine stuff
*Ribbon (optional)
STEP ONE:
Iron and lay out your fabric on your cutting surface. I chose this nifty Cars flannel I had around the house. Depending on the size of your fabric is how many bags you will get out of the fabric. One yard can make quite a bit of bags.

STEP TWO:
Cut your fabric to a 5x5 inch square (with fabric RIGHT SIDES TOGETHER). This step is customizable to your needs.


If you cut this on the fold you'll only need to sew 3 sides of the bag :)
STEP THREE:
Sew ALMOST all the way around the bag. Because you're going to have to turn this bag right side out, you'll be stopping about 1-2 inches from your original starting point. You'll be turning in a corner, so you can start about an inch from one corner, making sure you leave that corner open for turning.

STEP FOUR:
Once you've stitched almost all the way around, you can clip close to your seams--NOT THROUGH the stitching then turn the bag right sides out.

STEP FIVE:
Now you have a right sides out bag! Use a pencil or scissors to poke out the corners (except your open one LOL) and press if you'd like. (Flannel usually doesn't have as many wrinkles if you used that).

STEP SIX:
Now it's time to fill your bag! I usually use rice because it's the least expensive option but you can use flaxseed, dry cherry pits or even deer corn---DEER CORN not popcorn. Although if you use popcorn, I'd sure love to see the pics of exploding popcorn inside your bag...
I use a cup and a siphon to put the rice in the open corner hole.


STEP SEVEN:
Fill your bag approx. 3/4ths of the way full (or to your desired fullness) and tuck your open corner in nice and neat.

STEP EIGHT:
Cut a small ribbon or piece of fabric if you wish, fold it over and tuck it in your open corner. Stitch (straight or zigzag) the opening closed, making sure to back stitch. I stitch the opening at least twice to make sure it's secure.

STEP NINE:
Admire your handiwork! We like to store our bags in the freezer for beau beaus but you can also microwave the bag for 15-30 seconds at a time for a hot pack. USE CAUTION when handling the hot bag!

Now, why do I call it a Beau Beau bag instead of a boo boo? Because down south where I live, my family always said beau beau (pronounced like the actor Beau Bridges) instead of boo boo. I don't know anyone who says boo boo around here! Not that it's wrong if you do, that's just my story of why I call it what I do! :)
Enjoy your bags, whatever you call them, and feel free to share this tutorial!
~~Amy
Pin It
This tutorial is for my Beau Beau Bags, also called Boo Boo Bags, Rice Packs, rIce packs, ouch pouches and a gazillion other names. Basically it's a bag you use on ouches. This is for your traditional square rice pack, you can make them in a variety of shapes and sizes. Larger ones can be made for headaches of menstrual cramps.
Materials Needed:
*Fabric, you're cutting a square of your choice size, so you want at least a fat quarter to get a typical size bag, your choice flannel or fabric, even terry cloth or minky might be nice.
*Rotary Cutter or Scissors
*YardStick or Cutting Guide
*Sewing machine, Thread, needle, usual machine stuff
*Ribbon (optional)
STEP ONE:
Iron and lay out your fabric on your cutting surface. I chose this nifty Cars flannel I had around the house. Depending on the size of your fabric is how many bags you will get out of the fabric. One yard can make quite a bit of bags.

STEP TWO:
Cut your fabric to a 5x5 inch square (with fabric RIGHT SIDES TOGETHER). This step is customizable to your needs.


If you cut this on the fold you'll only need to sew 3 sides of the bag :)
STEP THREE:
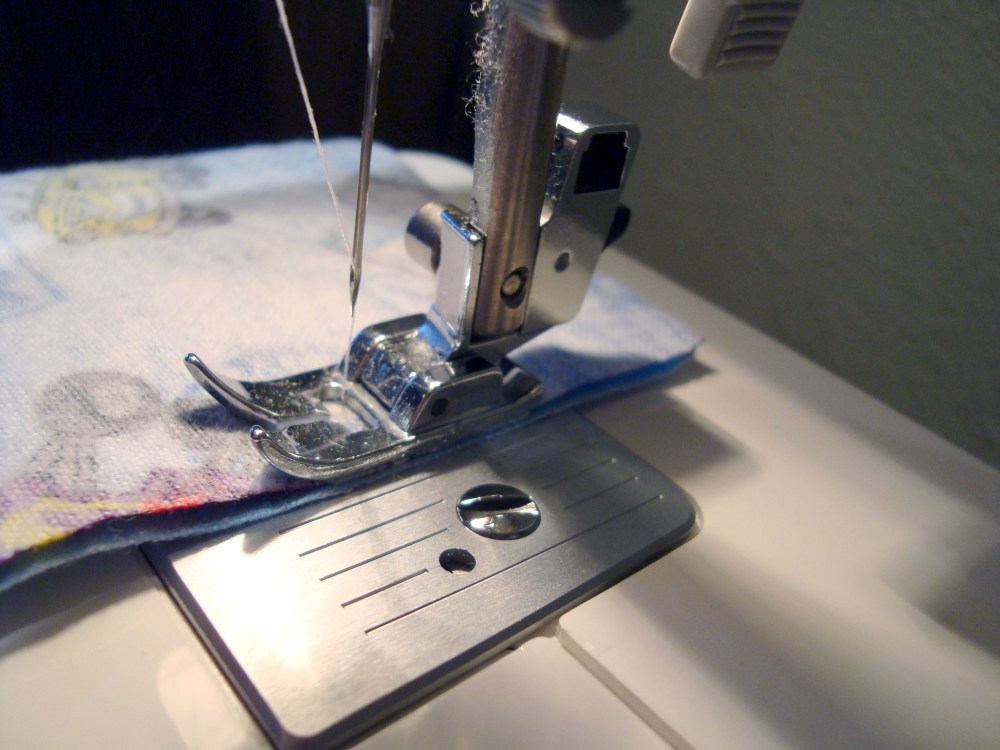
Sew ALMOST all the way around the bag. Because you're going to have to turn this bag right side out, you'll be stopping about 1-2 inches from your original starting point. You'll be turning in a corner, so you can start about an inch from one corner, making sure you leave that corner open for turning.
STEP FOUR:
Once you've stitched almost all the way around, you can clip close to your seams--NOT THROUGH the stitching then turn the bag right sides out.

STEP FIVE:
Now you have a right sides out bag! Use a pencil or scissors to poke out the corners (except your open one LOL) and press if you'd like. (Flannel usually doesn't have as many wrinkles if you used that).

STEP SIX:
Now it's time to fill your bag! I usually use rice because it's the least expensive option but you can use flaxseed, dry cherry pits or even deer corn---DEER CORN not popcorn. Although if you use popcorn, I'd sure love to see the pics of exploding popcorn inside your bag...
I use a cup and a siphon to put the rice in the open corner hole.


STEP SEVEN:
Fill your bag approx. 3/4ths of the way full (or to your desired fullness) and tuck your open corner in nice and neat.

STEP EIGHT:
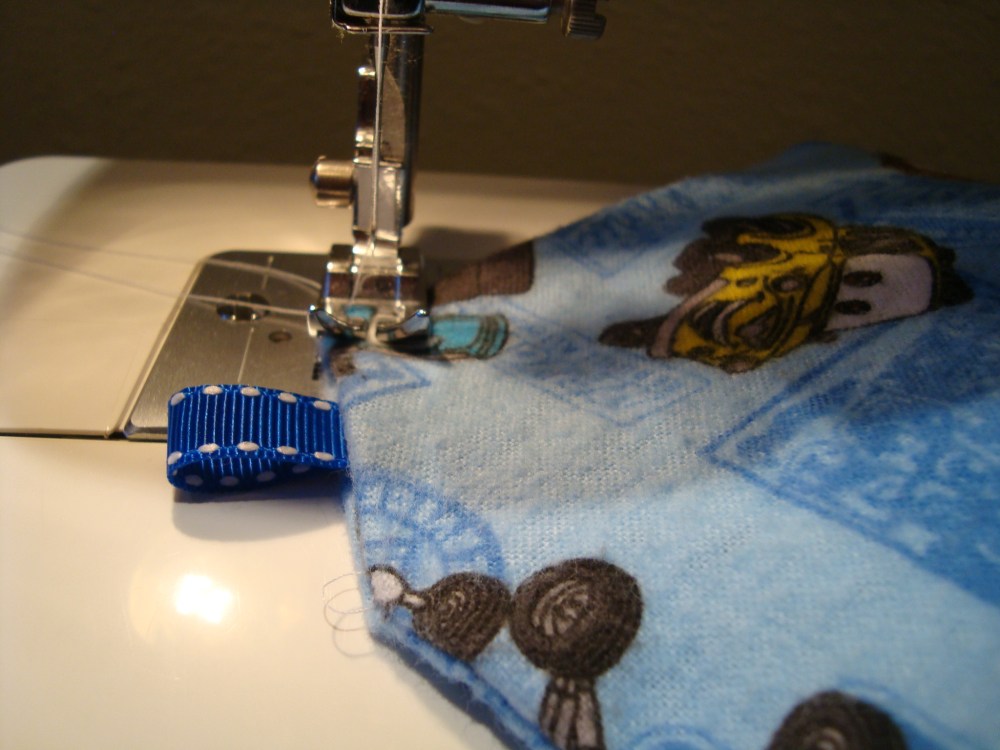
Cut a small ribbon or piece of fabric if you wish, fold it over and tuck it in your open corner. Stitch (straight or zigzag) the opening closed, making sure to back stitch. I stitch the opening at least twice to make sure it's secure.
STEP NINE:
Admire your handiwork! We like to store our bags in the freezer for beau beaus but you can also microwave the bag for 15-30 seconds at a time for a hot pack. USE CAUTION when handling the hot bag!

Now, why do I call it a Beau Beau bag instead of a boo boo? Because down south where I live, my family always said beau beau (pronounced like the actor Beau Bridges) instead of boo boo. I don't know anyone who says boo boo around here! Not that it's wrong if you do, that's just my story of why I call it what I do! :)
Enjoy your bags, whatever you call them, and feel free to share this tutorial!
~~Amy
Pin It

Thursday, July 8, 2010
Easy Pillowcase--Impatient Craftaholic Series
In keeping with my for the Impatient Craftaholic series...allow me to introduce "The Easy Pillowcase".
This tutorial is what happens when you bring your children to the fabric store with you just to get ONE THING (I swear!) and they find fabric they like. Sigh. It's hereditary.
Materials:
1 yard of your chosen fabric (we chose Spiderman..natch.)
Thread
Serger and thread (if you have it, if not, its ok)
Scissors and the usual sewing odds and ends.
Sewing Machine (unless you love hand sewing..which if that is the case you probably aren't needing this series of impatient crafting...)
Set your coffee to brew...this project is pretty darn fast.
Step One: Measurements, Schmeasurements.
I just grabbed a pillow from the house and used it as my measurement. Because this print is a directional print, I had to fold it raw edge to raw edge. In the end I ended up with a piece of fabric, folded, right sides together that measured about 33x18 or so. Your final measurements will vary based on your pillow size.


Step Two: The Almighty Serger
Now don't fret if you don't have a serger. If you DO, head on over to it with your fabric still in its nice little 33x18 inch or so fold. Since there is already a fold, you don't have to stitch that side of the pillowcase. So serge down the shorter side first (looking at the above picture, its the right hand side first). Then the longer "raw edge" side. This leaves you an unfinished pillowcase!!


Step Two: If you don't have a serger:
You can still sew down the same sides as the serger in the step above with your sewing machine. Because it is a pillowcase, it really doesn't matter if you have a raw edge inside the pillowcase---at least in my world it's okay. Just stitch with your machine in a straight stitch as I said in the serged instructions. If you really feel the need, use pinking shears to 'pink' the edges along the stitches for security.
Step Three: Hemming It up
After the inside of your pillowcase is done, move on to your hem. Keep the case with wrong sides out, and fold down a small hem. How big your hem is, really depends on the size of your pillow and how much extra fabric you want hanging off your pillow.
Use your iron to press your first hem.

Step Four:
Fold down again until you find a hem you're comfortable with. Nope my lines aren't totally straight. Ahem, Impatient Craftaholic....

Step Five: Head back to your regular sewing machine
Now at your regular sewing machine, just stitch your hem! Sew one line close to the folded edge, then if you'd like, sew another line on the outer edge.


Now fold your pillowcase right side out and viola...a nifty spider man pillowcase!! (Yes I know, I need a picture of the finished pillowcase...but the kid is sleeping on it right now..)
And if you keep some fabric left over, you can make a nifty SpiderMan shirt for your little one :)

***Enjoy and happy sewing! Let me know if you have any questions! Stay Tuned for the Next Installment of the Impatient Craftaholic!
~~~Amy
Subscribe to:
Posts (Atom)
LinkWithin
