Oops, I did it again, another video tutorial. I'm being a goof in this one but hope you like :) Yes, I still wear scrunchies. I realize they're not cool, but alas, I don't care. I can't STAND hair in my face!!
Enjoy!

The Hesitant Homeschooler....Mama's Little Monkeys
Showing posts with label easy sewing. Show all posts
Showing posts with label easy sewing. Show all posts
Friday, January 14, 2011


Sunday, July 18, 2010
Serged Cloth Wipes--Impatient Craftaholic Series
Hi guys! Tutorial Time! This one is for those with a serger or who have access to a serger. Chances are many of you already know how to do this, but this is a great newbie tutorial! :)
Materials Needed:
Serger (or sewing machine with overcasting stitch--not QUITE the same but close.)
Threads, needles, scissors (usual sewing stuff!)
Flannel (Terry Cloth and Sherpa are other good wipe fabrics)
Fray Check
Rotary Cutter or Large Scissors
Yardstick/Ruler
Step One:
Gather Materials. Choose the size of your cloth wipe. I used a flannel I had previously cut for Beau Beau bags so the fabric was already cut to a certain point. I cut this fabric 6 inches tall and 14 inches wide. If you are using a directional print, be careful in your cutting. Remember, measure TWICE, cut ONCE! This fabric is folded RIGHT SIDES TOGETHER in my pics, but in reality you can cut it WRONG SIDES together because you're going to serge it. This tutorial is for a two ply wipe. If you'd prefer a one ply wipe, just serge one layer of fabric at a time.


The size wipes you end up with will vary based on your choice in cutting size.
Because I had a long strip 6x14, I cut the fabric at the 7 inch mark to make two wipes.

Step Two:
We're making two ply wipes here, so take your fabrics and put them right sides facing out if you didn't cut them that way. (Sorry I'm an impatient crafter so I took pics without thinking ahead!)

Step Three:
Now head over to your serger! If you do NOT have a serger, but have a sewing machine with an overcasting stitch, you can use that. It's not quite the same, but it does work some. So mosey on over to your serger with your little square with wrong sides together.

Serge down any side you choose first, if you are doing multiple wipes at once, you can serge down the side of many at a time in a chain.
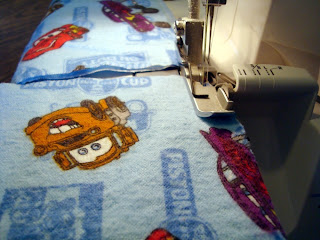
Generally once I do a bunch on one side, then I start on another side.
 Step Four:
So just continue on and serge all four sides until your wipe is complete!! Add some Fray Check on the corners to help them from fraying in the wash.

And now you're done!! Use your wipes for cloth diapering, kids hankerchief's, cleaning and more!
~~Amy
Materials Needed:
Serger (or sewing machine with overcasting stitch--not QUITE the same but close.)
Threads, needles, scissors (usual sewing stuff!)
Flannel (Terry Cloth and Sherpa are other good wipe fabrics)
Fray Check
Rotary Cutter or Large Scissors
Yardstick/Ruler
Step One:
Gather Materials. Choose the size of your cloth wipe. I used a flannel I had previously cut for Beau Beau bags so the fabric was already cut to a certain point. I cut this fabric 6 inches tall and 14 inches wide. If you are using a directional print, be careful in your cutting. Remember, measure TWICE, cut ONCE! This fabric is folded RIGHT SIDES TOGETHER in my pics, but in reality you can cut it WRONG SIDES together because you're going to serge it. This tutorial is for a two ply wipe. If you'd prefer a one ply wipe, just serge one layer of fabric at a time.


The size wipes you end up with will vary based on your choice in cutting size.
Because I had a long strip 6x14, I cut the fabric at the 7 inch mark to make two wipes.

Step Two:
We're making two ply wipes here, so take your fabrics and put them right sides facing out if you didn't cut them that way. (Sorry I'm an impatient crafter so I took pics without thinking ahead!)

Step Three:
Now head over to your serger! If you do NOT have a serger, but have a sewing machine with an overcasting stitch, you can use that. It's not quite the same, but it does work some. So mosey on over to your serger with your little square with wrong sides together.

Serge down any side you choose first, if you are doing multiple wipes at once, you can serge down the side of many at a time in a chain.

Generally once I do a bunch on one side, then I start on another side.

So just continue on and serge all four sides until your wipe is complete!! Add some Fray Check on the corners to help them from fraying in the wash.

And now you're done!! Use your wipes for cloth diapering, kids hankerchief's, cleaning and more!
~~Amy
Thursday, July 8, 2010
Easy Pillowcase--Impatient Craftaholic Series
In keeping with my for the Impatient Craftaholic series...allow me to introduce "The Easy Pillowcase".
This tutorial is what happens when you bring your children to the fabric store with you just to get ONE THING (I swear!) and they find fabric they like. Sigh. It's hereditary.
Materials:
1 yard of your chosen fabric (we chose Spiderman..natch.)
Thread
Serger and thread (if you have it, if not, its ok)
Scissors and the usual sewing odds and ends.
Sewing Machine (unless you love hand sewing..which if that is the case you probably aren't needing this series of impatient crafting...)
Set your coffee to brew...this project is pretty darn fast.
Step One: Measurements, Schmeasurements.
I just grabbed a pillow from the house and used it as my measurement. Because this print is a directional print, I had to fold it raw edge to raw edge. In the end I ended up with a piece of fabric, folded, right sides together that measured about 33x18 or so. Your final measurements will vary based on your pillow size.


Step Two: The Almighty Serger
Now don't fret if you don't have a serger. If you DO, head on over to it with your fabric still in its nice little 33x18 inch or so fold. Since there is already a fold, you don't have to stitch that side of the pillowcase. So serge down the shorter side first (looking at the above picture, its the right hand side first). Then the longer "raw edge" side. This leaves you an unfinished pillowcase!!


Step Two: If you don't have a serger:
You can still sew down the same sides as the serger in the step above with your sewing machine. Because it is a pillowcase, it really doesn't matter if you have a raw edge inside the pillowcase---at least in my world it's okay. Just stitch with your machine in a straight stitch as I said in the serged instructions. If you really feel the need, use pinking shears to 'pink' the edges along the stitches for security.
Step Three: Hemming It up
After the inside of your pillowcase is done, move on to your hem. Keep the case with wrong sides out, and fold down a small hem. How big your hem is, really depends on the size of your pillow and how much extra fabric you want hanging off your pillow.
Use your iron to press your first hem.

Step Four:
Fold down again until you find a hem you're comfortable with. Nope my lines aren't totally straight. Ahem, Impatient Craftaholic....

Step Five: Head back to your regular sewing machine
Now at your regular sewing machine, just stitch your hem! Sew one line close to the folded edge, then if you'd like, sew another line on the outer edge.


Now fold your pillowcase right side out and viola...a nifty spider man pillowcase!! (Yes I know, I need a picture of the finished pillowcase...but the kid is sleeping on it right now..)
And if you keep some fabric left over, you can make a nifty SpiderMan shirt for your little one :)

***Enjoy and happy sewing! Let me know if you have any questions! Stay Tuned for the Next Installment of the Impatient Craftaholic!
~~~Amy
Tuesday, July 6, 2010
Terrific Tuesday
Ahhh...summer vacation...I'm enjoying having my boys around all day, and settling into life as a WAHM again after deciding not to return to work full time :) Soooo content with that decision.
So here we have a Terrific Tuesday.
Woke up early before, the boys, and enjoyed the peace and coffee.

Gathered my goodies for chicken gumbo in the crock pot...:)

and THEN...the mail came with a goodie box of FABRIC!!!

So that's a nifty Tuesday as far as I'm concerned!! How was your Fourth of July weekend?

So here we have a Terrific Tuesday.
Woke up early before, the boys, and enjoyed the peace and coffee.


Gathered my goodies for chicken gumbo in the crock pot...:)

and THEN...the mail came with a goodie box of FABRIC!!!

So that's a nifty Tuesday as far as I'm concerned!! How was your Fourth of July weekend?

Saturday, July 3, 2010
Operation Cut Fabric is On.
Ok, so we all know I'm a supply hoarder. (Case in Point, my other blog, SupplyaHolics.) But this is getting insane. I simply MUST use some of my fabric. My downfall is, I create things that can easily be done in a gazillion prints...toys, bags, aprons, etc....but I don't want to make 20 aprons in 20 different prints if they don't SELL, you know? But I do have to admit I could use some of these supplies and still be okay...
So it is my mission. USE THESE SUPPLIES. Why is this important? Because I may very well be suffocated under the pile of fabric coming my way. I don't even want to count the yardage. Somewhere between 20-50 I'd think.
I've already decided I'm not returning to work full time, so there is no reason I can't make myself a schedule and get things DONE! I HAVE to stop being distracted by other projects..I must....
So what I need is ya'lls help. Help me NOT BUY FABRIC. PLEASE!!! I know I am surrounded by temptation but unless I have a very specific IMMINENT need for the fabric, there is no excuse for buying anymore for a good while. Especially when I'm sitting in the middle of hurricane season and one storm could destroy my entire home and precious supply collection.
I NEED HELP.
I'll keep you posted...
~~Amy
So it is my mission. USE THESE SUPPLIES. Why is this important? Because I may very well be suffocated under the pile of fabric coming my way. I don't even want to count the yardage. Somewhere between 20-50 I'd think.
I've already decided I'm not returning to work full time, so there is no reason I can't make myself a schedule and get things DONE! I HAVE to stop being distracted by other projects..I must....
So what I need is ya'lls help. Help me NOT BUY FABRIC. PLEASE!!! I know I am surrounded by temptation but unless I have a very specific IMMINENT need for the fabric, there is no excuse for buying anymore for a good while. Especially when I'm sitting in the middle of hurricane season and one storm could destroy my entire home and precious supply collection.
I NEED HELP.
I'll keep you posted...
~~Amy
Tuesday, June 29, 2010
Easy No Sew Fabric Wreath Tutorial-- Impatient Craftaholic Series
Ahhh, fabric...it's beautiful isn't it? But sometimes you don't WANT to sew but you want to get your hands on that pretty fabric. Or you need a quickie project? Well, here you go!
I shall teach you how to create a nifty NO SEW fabric wreath. No ironing either (unless you're just a slob with fabric and well, then...you deserve to have to iron for that fabric abuse.).
Seriously, SUPER EASY wreath that looks like you spent a fortune.
To help those with slower internet, I've uploaded this tutorial with more details on Flickr. Let me know if there are any questions!
The best part about this fabric wreath? If you really want to save some dough, you can actually pull out each of the pieces of fabric and ribbon and replace them with new fabric for each occasion!
Check out the FLICKR TUTORIAL HERE.
A Tip to make the wreath Permanent from my friend Sharon: Use fabric glue on the tip of the fabric as you shove it in and it will permanently stick :)
My Who Dat Saints Wreath:

My July Fourth Wreath, a different way to do it:

You can even use this method on those nifty styrofoam balls!

Enjoy!!! I'd love to see your wreaths!
I shall teach you how to create a nifty NO SEW fabric wreath. No ironing either (unless you're just a slob with fabric and well, then...you deserve to have to iron for that fabric abuse.).
Seriously, SUPER EASY wreath that looks like you spent a fortune.
To help those with slower internet, I've uploaded this tutorial with more details on Flickr. Let me know if there are any questions!
The best part about this fabric wreath? If you really want to save some dough, you can actually pull out each of the pieces of fabric and ribbon and replace them with new fabric for each occasion!
Check out the FLICKR TUTORIAL HERE.
A Tip to make the wreath Permanent from my friend Sharon: Use fabric glue on the tip of the fabric as you shove it in and it will permanently stick :)
My Who Dat Saints Wreath:

My July Fourth Wreath, a different way to do it:

You can even use this method on those nifty styrofoam balls!

Enjoy!!! I'd love to see your wreaths!
Subscribe to:
Posts (Atom)
LinkWithin
