I thought I would share a little bit of what happens when you purchase one of my handmade or destash supply items. Where does your money go? I love companies that offer full disclosure about their profits/margins and business practices, so I thought I'd do the same.
Of any given purchase from one of my shops, be it on Etsy, Artfire, Cafepress or Zazzle, these are the things you help fund:
**First and foremost, my number one goal is to never have to dip into personal "family" funds for supplies. So all supplies I need to further create handmade are purchased with profit.
**A large chunk goes to business fees such as: venue fees, taxes, printing materials, business marketing materials, paying for my CPA, shipping supplies, etc. The 'bones' of running a business, shall we say.
After those expenses are taken care of (which are a HUGE chunk of my profit.) We get on to the 'real' stuff.
Your purchase of my handmade items can at any given time pay for one, some, or all of these things:
*Healthy food for my children and family. Organic and gluten free ain't cheap.
*Vet bills and pet care! My husband insisted I pay for the dog out of "my" money since she was my idea. I gladly do so, just sharing.
*Fun stuff for me off the very venues I sell on. I believe in putting it back! I purchase a good bit of supplies, vintage and handmade items off Etsy and Artfire, just as I sell there! My latest focus has been on vintage items to redecorate our home!
*Presents for my husband for special days and events. It's just not fun to buy his anniversary present out of OUR money....it's however incredibly fulfilling to be able to buy his special gifts with money I earned of my own accord. (and chances are, those items are bought OFF handmade venues, like the hand stamped guitar picks he got for our anniversary!)
*Special trips and events that aren't in our family budget...like day trips with the kids, concerts, etc. Right now the majority of my profit intended for supplies is being saved for a high dollar supply item I want/need. The other % for "me" is going towards a family car. I realize it will be years probably before I can save up a valid amount, but we hope to make my '96 last a few more years. (A good reason to marry a mechanic, ladies...he'll keep your car running!)
I'm sure there are other little things I'm not thinking about, and that handmade artisans and small business owners all over have similar lists. I just wanted to show you, when you buy local or handmade, you are buying from an actual person...not a huge conglomerate who makes millions. We shop owners are real people, with real families, trying to run a legit business. We are not in pyramid schemes, we are not selling Amway, we are not even trying to hawk mass manufactured items at home parties (not that that is a bad way to make a living.) But we are real, flesh and blood humans who in the case of handmade items, are actually physically making the items you purchase with our own two hands. We are creating, putting together, sewing, painting, stitching, sanding, cutting, designing, weaving, shooting, hammering, drawing, items just for you. We sniff strong glue for you! :)
So, next time you need to make a purchase, be it for fun or work, consider handmade. Consider the source. I believe in a life that is based on the minimalist principles. Living simply is not about not having things, but rather, enjoying, cherishing and RESPECTING the material possessions you do spend your hard earned money on.
Thanks for listening and thank YOU for reading my blog, looking at my items, watching me grow, trying my tutorials, and purchasing my items....it really, truly, does help me every day and mean a lot to me.
~~Thank you!!!
~~Amy

The Hesitant Homeschooler....Mama's Little Monkeys
Showing posts with label beginner sewing. Show all posts
Showing posts with label beginner sewing. Show all posts
Friday, July 1, 2011


Thursday, June 9, 2011
girl, disconnected....doing what I love again...
Day 9.....ahhh a good day. My mother-in-law blessedly took the children for a few hours so I was able to get some actual sewing done!! Serging, to be exact. It was so nice...I haven't been able to sew for awhile now, since school got out, and it was so nice to finish up a stack of to-do's.
First up, I FINALLY recovered my sofa pillows. Now that we have a doggy, I thought this was a good time so I can take the covers off and wash them. You can see the original pillow under the sleeping Libby.


I also got most of my stack of pillowcases done for my Pillowcase Drive for ConKerr Cancer. I have a stack from a fellow handmade friend and as of now we have 19 cases ready! Hopefully I can reach my goal by the end of July, but even if not, I am happy we can send these over and hopefully make a sick child smile!

I've also had a lotta fun the past few days. I've danced to Adele with Eli, did arts and crafts with the boys and of course played with the dog. The poor doggy also encountered a cat and is recovering from an eye scratch, but hopefully she'll be fine. She goes back to the vet on Monday.
What have you been making and doing lately??
I did cheat and check facebook messages as apparently I had some people who needed answers to questions. But I was quick and just checked my messages!! :)
My big plans for tonight are hunkering down with a movie ("The Notebook." No, I've never seen it. I got a warning letter that they were gonna kick me outta the chick club if I didn't watch it.....so Netflix sent it along for me.) Popcorn, movie and snugging on the sofa. Don't call by the way..
~~amy
First up, I FINALLY recovered my sofa pillows. Now that we have a doggy, I thought this was a good time so I can take the covers off and wash them. You can see the original pillow under the sleeping Libby.


I also got most of my stack of pillowcases done for my Pillowcase Drive for ConKerr Cancer. I have a stack from a fellow handmade friend and as of now we have 19 cases ready! Hopefully I can reach my goal by the end of July, but even if not, I am happy we can send these over and hopefully make a sick child smile!

I've also had a lotta fun the past few days. I've danced to Adele with Eli, did arts and crafts with the boys and of course played with the dog. The poor doggy also encountered a cat and is recovering from an eye scratch, but hopefully she'll be fine. She goes back to the vet on Monday.
What have you been making and doing lately??
I did cheat and check facebook messages as apparently I had some people who needed answers to questions. But I was quick and just checked my messages!! :)
My big plans for tonight are hunkering down with a movie ("The Notebook." No, I've never seen it. I got a warning letter that they were gonna kick me outta the chick club if I didn't watch it.....so Netflix sent it along for me.) Popcorn, movie and snugging on the sofa. Don't call by the way..
~~amy
Friday, January 14, 2011
Impatient Craftaholic Series--Sewing a Scrunchie
Oops, I did it again, another video tutorial. I'm being a goof in this one but hope you like :) Yes, I still wear scrunchies. I realize they're not cool, but alas, I don't care. I can't STAND hair in my face!!
Enjoy!
Enjoy!
Monday, October 11, 2010
Impatient Craftaholic Series---Upcycle Baby Shirt Pillows
Helloooooooooo I'm back! It's time for another Impatient Craftaholic tutorial! This is a super fast craft for anyone with even simple sewing skills!
Let's make this little fella!

MATERIALS:
Old baby/kids shirt or onesie.
Sewing Machine (not required)
Thread (coordinating or contrasting the neck hem color)
Hand Sewing Needle
Scissors
Fiberfill
(Helpful links are found within the steps.)
Step One:
Lay out your shirt on your cutting mat. If it's a onesie, you can cut a straight cut at the bottom of the shirt to open the onesie snap seam. Smooth and flatten the shirt so you can line it up as you wish.

Step Two:
Turn the shirt inside out and again smooth it so the design is centered (if you'd like). Pin along the bottom seam so you can keep things even. Don't be frightened if the fabric is a stretchy knit. Tips for sewing knits at the bottom.

Step Three:
Straight stitch (or serge if you have a serger) along the bottom seam. Since this is a finished piece of clothing, you can use the hem stitches already there as a guide if you'd like!


Step Six:
Head for the stuffing!! I love Morning Glory Polyester Fiberfill, but you can use whichever you like.


TIPS FOR SEWING KNITS:
The good thing about this pillow is it doesn't need to be perfect! When sewing with knits here are some tips:
*Pin or clip frequently.
*Use a microtex or ball point needle
*Use a walking foot if the fabric is really thick.
Enjoy!! Feel free to share this tutorial!
~~Amy
Let's make this little fella!

MATERIALS:
Old baby/kids shirt or onesie.
Sewing Machine (not required)
Thread (coordinating or contrasting the neck hem color)
Hand Sewing Needle
Scissors
Fiberfill
(Helpful links are found within the steps.)
Step One:
Lay out your shirt on your cutting mat. If it's a onesie, you can cut a straight cut at the bottom of the shirt to open the onesie snap seam. Smooth and flatten the shirt so you can line it up as you wish.

Step Two:
Turn the shirt inside out and again smooth it so the design is centered (if you'd like). Pin along the bottom seam so you can keep things even. Don't be frightened if the fabric is a stretchy knit. Tips for sewing knits at the bottom.

Step Three:
Straight stitch (or serge if you have a serger) along the bottom seam. Since this is a finished piece of clothing, you can use the hem stitches already there as a guide if you'd like!

Step Four:
Sew a straight stitch (or serge) along the open ends of the sleeves. You are sewing up all openings EXCEPT the neck. So now you have an inside out, nearly sewn up pillow!

Step Five:
Flip your shirt right side out and push out your corners and seams.

Step Six:
Head for the stuffing!! I love Morning Glory Polyester Fiberfill, but you can use whichever you like.

Begin stuffing the shirt through the open neckhole.

Step Seven:
Continue stuffing the "body" of the shirt with fiberfill, filling to the size you want...whether you want a thin vs. thick pillow. Be sure to sort of fluff the fiberfill before you shove it in the shirt or it will bind up and make little balls. Stuff and fluff to the desired size of your pillow. Be sure to stuff the little arms too!


Step Eight:
So now you have a stuffed pillow with an open neckhole. Here is where you need to hand sew the opening closed. Thread your needle. Hand sew your neckhole, shoving the fiberfill in so it doesn't catch in the needle and thread as you sew. You can grasp the neckhole closed with your hand, or by pinning it. The type of stitch you use is up to you. I used a blanket stitch. You can find more stitches here.
I used a contrasting thread that matched the body of the shirt but added some color to the neckhole. You choose your thread!

That's it, you're done!! You've just sewn a baby shirt pillow in no time flat! Even with hand sewing and stuffing I made this pillow in less than 30 minutes!
This pillow was a onesie with long sleeves! I cut off the longer sleeves and cut a straight line at the bottom for my hem!

TIPS FOR SEWING KNITS:
The good thing about this pillow is it doesn't need to be perfect! When sewing with knits here are some tips:
*Pin or clip frequently.
*Use a microtex or ball point needle
*Use a walking foot if the fabric is really thick.
Enjoy!! Feel free to share this tutorial!
~~Amy
Monday, October 4, 2010
Home Again....New Directions, Cleaning and another Addiction...
Hello friends! I am home again after a recent trip to Gulf Shores, AL. It was beautiful, and a great trip for spiritual and family renewal and I am grateful we take such a trip every year!
I shall reopen my shops hopefully on the 10th. I'll be evaluating where I want certain items to go. I took advantage of the Artfire 5.95 a month deal and would like to refocus my energies on selling on Artfire for 2011. So we shall see how that goes as I reopen, move things around and put certain items on SALE :)
I'm still blogging also at Daily Handmade Picks if you've not taken a gander over there. I'm enjoying it, simple, short and to the point!
Our trip also brought me home with a new computer since our old one was slow as molasses, and that also brought me back to memory lane---I got Sims 3. I forgot how addicting that game is. So if ya'll don't see me make new stuff for awhile, you know why, I'm spending all of Eli's naps in Sims land! Nahh I don't have an addictive personality!
I also tried a nifty technique today. See, I am determined to get my household ORGANIZED so I can better focus my time on kids, house, work, creating, bible study, and fun. So today I tried my friend Dee's tip of cleaning for 10 minutes at a time. I decided to do 15 minutes every hour. So on the 45 of every hour I will clean, tidy, put away!
It is amazing how much you get done in that uninterrupted time! In 15 minutes I was able to load dishes, wipe down counter, make bed, pick up toys and clothes, sweep and still had minutes to spare to change a diaper!! :) I will not do the plan during Eli's nap which is my "work" time...sewing, creating, photographing, listing, etc. But I'm hopefully that I can keep it up. I'm guessing if you need a major DEEP clean you should do that first, then this is a great method at KEEPING things clean!
So what's new with you guys? How is your fall going? Fall is my favorite time of year! Cooler weather, football, hurricane season ends! Its also a time to clean out, decorate for harvest time (we don't do Halloween or Christmas but I love to prepare for Thanksgiving and fall season!) and just enjoy the beautiful weather!
And on that note guys, hot chocolate calls me!!
 ~~amy
~~amy
I shall reopen my shops hopefully on the 10th. I'll be evaluating where I want certain items to go. I took advantage of the Artfire 5.95 a month deal and would like to refocus my energies on selling on Artfire for 2011. So we shall see how that goes as I reopen, move things around and put certain items on SALE :)
I'm still blogging also at Daily Handmade Picks if you've not taken a gander over there. I'm enjoying it, simple, short and to the point!
Our trip also brought me home with a new computer since our old one was slow as molasses, and that also brought me back to memory lane---I got Sims 3. I forgot how addicting that game is. So if ya'll don't see me make new stuff for awhile, you know why, I'm spending all of Eli's naps in Sims land! Nahh I don't have an addictive personality!
I also tried a nifty technique today. See, I am determined to get my household ORGANIZED so I can better focus my time on kids, house, work, creating, bible study, and fun. So today I tried my friend Dee's tip of cleaning for 10 minutes at a time. I decided to do 15 minutes every hour. So on the 45 of every hour I will clean, tidy, put away!
It is amazing how much you get done in that uninterrupted time! In 15 minutes I was able to load dishes, wipe down counter, make bed, pick up toys and clothes, sweep and still had minutes to spare to change a diaper!! :) I will not do the plan during Eli's nap which is my "work" time...sewing, creating, photographing, listing, etc. But I'm hopefully that I can keep it up. I'm guessing if you need a major DEEP clean you should do that first, then this is a great method at KEEPING things clean!
So what's new with you guys? How is your fall going? Fall is my favorite time of year! Cooler weather, football, hurricane season ends! Its also a time to clean out, decorate for harvest time (we don't do Halloween or Christmas but I love to prepare for Thanksgiving and fall season!) and just enjoy the beautiful weather!
And on that note guys, hot chocolate calls me!!
Monday, August 2, 2010
Easy Blanket Tutorial--Impatient Craftaholic Series
Time for another tutorial! Let's make a nifty blanket!
Materials:
Fabric 1 you want (I used minky)
Fabric 2 you want (I used cotton) The yardage is really up to you. You just want Fabric 2 to be larger than Fabric 1 by about 2-3 inches on all 4 edges if you lay them down (pics below).
Sewing Machine
Thread and usual sewing notions
Pins
Frosty Cold Drink (or Toasty Hot Drink if it's winter when you make this)
Helpful tip: If this blanket is for a child, you can usually get by with 1 yard of each of your fabrics, you'll just have to cut Fabric 1 smaller than Fabric 2 to do your overlap.
Step One:
Lay our your fabric. In my case, my cotton was my larger piece. Lay this piece out WRONG SIDE UP, completely spread out. Lay your smaller fabric (minky in my case) on top of the cotton RIGHT SIDE UP. Center it, almost like the cotton is a border around the minky.

Step Two:
Be interrupted by your child.

Step Three:
Fold your cotton over once til it meets the edge of the minky. If you've gotten everything nice and centered this will go smoothly. You may have to cut some cotton if you have too much.

Step Four:
Fold the cotton again so it overlaps the minky and pin.

Step Five:
Continue this all the way around. When you get to the corners you can fold a sort of V, almost as if you were wrapping a package.


Step Six:
Now your cotton should be folded all around your minky on every edge and pinned. If you're really in the mood you can iron the overlap at this point to make it nice and crisp. BE CAREFUL if you are using minky though because you should not directly iron minky. Iron depending on your fabric's needs. Or be like me, impatient and just head to the sewing machine.

Step Seven:
To the sewing machine!! Use your regular or walking foot and sew a straight stitch all the way around the blanket close to the edge where the cotton meets the minky. This assures you go through all the layers and your blanket is secure. If you'd like you can do an extra stitch along the OUTSIDE edge of the blanket, but you don't have to. I did not. IMPATIENT, remember?

Step Eight:
When you get to the corners, I generally go down the corner to the tip, turn around and go back down, resuming the straight stitch after turning the fabric where it needs to go. This is up to you and how you want your stitches to look.


Step Nine:
Continue this all around your blanket to secure all the corners. You should not backstitch with a walking foot, so if you used one, you may want to put your regular foot back on to secure your starting and stopping point. Note, I did not, because I'm impatient and the blanket is holding up just fine.

Step Ten:
Give to your favorite little person! :) You can mix this up with various fabric types. I've made some beautiful blankets with satin overlapping minky. Do remember when working with minky or satin or other slippery, stretchy fabrics, pinning or clipping is your friend, and walking foots help with layers!

Enjoy! Just keep swimming! :)
Materials:
Fabric 1 you want (I used minky)
Fabric 2 you want (I used cotton) The yardage is really up to you. You just want Fabric 2 to be larger than Fabric 1 by about 2-3 inches on all 4 edges if you lay them down (pics below).
Sewing Machine
Thread and usual sewing notions
Pins
Frosty Cold Drink (or Toasty Hot Drink if it's winter when you make this)
Helpful tip: If this blanket is for a child, you can usually get by with 1 yard of each of your fabrics, you'll just have to cut Fabric 1 smaller than Fabric 2 to do your overlap.
Step One:
Lay our your fabric. In my case, my cotton was my larger piece. Lay this piece out WRONG SIDE UP, completely spread out. Lay your smaller fabric (minky in my case) on top of the cotton RIGHT SIDE UP. Center it, almost like the cotton is a border around the minky.
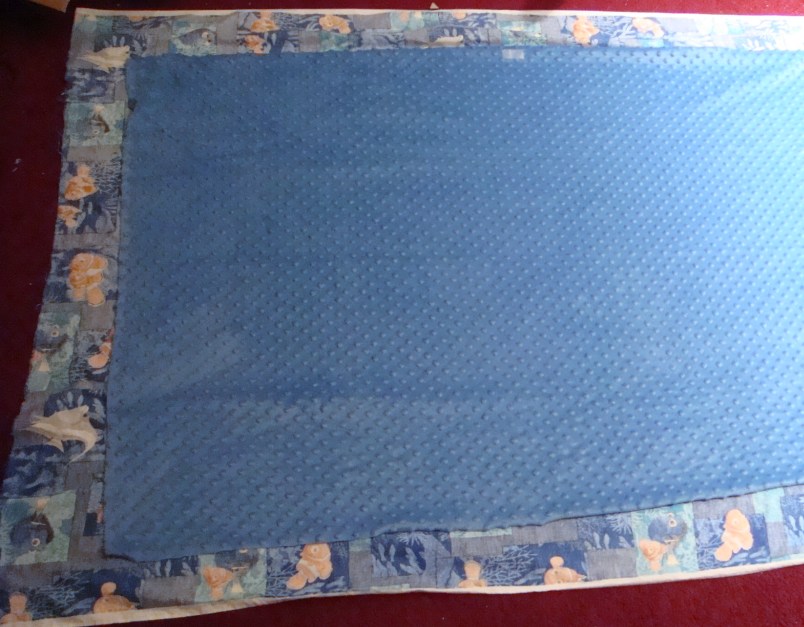
Step Two:
Be interrupted by your child.

Step Three:
Fold your cotton over once til it meets the edge of the minky. If you've gotten everything nice and centered this will go smoothly. You may have to cut some cotton if you have too much.

Step Four:
Fold the cotton again so it overlaps the minky and pin.

Step Five:
Continue this all the way around. When you get to the corners you can fold a sort of V, almost as if you were wrapping a package.


Step Six:
Now your cotton should be folded all around your minky on every edge and pinned. If you're really in the mood you can iron the overlap at this point to make it nice and crisp. BE CAREFUL if you are using minky though because you should not directly iron minky. Iron depending on your fabric's needs. Or be like me, impatient and just head to the sewing machine.

Step Seven:
To the sewing machine!! Use your regular or walking foot and sew a straight stitch all the way around the blanket close to the edge where the cotton meets the minky. This assures you go through all the layers and your blanket is secure. If you'd like you can do an extra stitch along the OUTSIDE edge of the blanket, but you don't have to. I did not. IMPATIENT, remember?

Step Eight:
When you get to the corners, I generally go down the corner to the tip, turn around and go back down, resuming the straight stitch after turning the fabric where it needs to go. This is up to you and how you want your stitches to look.


Step Nine:
Continue this all around your blanket to secure all the corners. You should not backstitch with a walking foot, so if you used one, you may want to put your regular foot back on to secure your starting and stopping point. Note, I did not, because I'm impatient and the blanket is holding up just fine.

Step Ten:
Give to your favorite little person! :) You can mix this up with various fabric types. I've made some beautiful blankets with satin overlapping minky. Do remember when working with minky or satin or other slippery, stretchy fabrics, pinning or clipping is your friend, and walking foots help with layers!

Enjoy! Just keep swimming! :)
Subscribe to:
Posts (Atom)
LinkWithin
