Heylo all! In case you've missed it, roughly 6 months ago I started learning how to crochet and knit. I am loving it. If I'd known I could craft while sitting on my butt watching Big Bang Theory, I'd have never learned to sew! (But then, I probably wouldn't have ever learned how to make fabric buttons, so I'm glad I did!)
But I digress, as usual....
Anyhoo, I participated in a fun Crochet a Long (CAL) where I ended up with a beautiful sunburst granny square afghan. I truly enjoyed it and now it's time to take my turn hosting!!
You need to be on ravelry to truly participate, so hop on over and join! It's free and a great place for patterns and showing off your work!
It will be a MONTHLY project that goes on ALL YEAR. Each month we will do a new dishcloth/towel/washcloth. Crochet AND knit patterns will be available, so you can do one, some, all or none!! If you do each month, in the end you'll have 12 handmade washcloths!!
Patterns will be posted and all I ask is you share your progress, pics and lessons learned in the Ravelry group!
You can find the group here:
Mama's Monthly Dishcloth KAL and CAL
The January project is listed so hop to it!! :)
~Enjoy!~
Amy

The Hesitant Homeschooler....Mama's Little Monkeys
Showing posts with label sewing patterns. Show all posts
Showing posts with label sewing patterns. Show all posts
Thursday, December 29, 2011


Thursday, December 22, 2011
What I Made...
This week I finished up a pillow cover I'd been working on. It was an experiment to see if I could wing the basic stitch and make my own pattern. Turns out I could :)
The details of the makings of it are on Ravelry if you are interested. Basically its rows of single crochet and a double crochet circle for the ends :)
I made it to match my fun new sock monkey sheets!


The details of the makings of it are on Ravelry if you are interested. Basically its rows of single crochet and a double crochet circle for the ends :)
I made it to match my fun new sock monkey sheets!


Monday, August 2, 2010
Easy Blanket Tutorial--Impatient Craftaholic Series
Time for another tutorial! Let's make a nifty blanket!
Materials:
Fabric 1 you want (I used minky)
Fabric 2 you want (I used cotton) The yardage is really up to you. You just want Fabric 2 to be larger than Fabric 1 by about 2-3 inches on all 4 edges if you lay them down (pics below).
Sewing Machine
Thread and usual sewing notions
Pins
Frosty Cold Drink (or Toasty Hot Drink if it's winter when you make this)
Helpful tip: If this blanket is for a child, you can usually get by with 1 yard of each of your fabrics, you'll just have to cut Fabric 1 smaller than Fabric 2 to do your overlap.
Step One:
Lay our your fabric. In my case, my cotton was my larger piece. Lay this piece out WRONG SIDE UP, completely spread out. Lay your smaller fabric (minky in my case) on top of the cotton RIGHT SIDE UP. Center it, almost like the cotton is a border around the minky.

Step Two:
Be interrupted by your child.

Step Three:
Fold your cotton over once til it meets the edge of the minky. If you've gotten everything nice and centered this will go smoothly. You may have to cut some cotton if you have too much.

Step Four:
Fold the cotton again so it overlaps the minky and pin.

Step Five:
Continue this all the way around. When you get to the corners you can fold a sort of V, almost as if you were wrapping a package.


Step Six:
Now your cotton should be folded all around your minky on every edge and pinned. If you're really in the mood you can iron the overlap at this point to make it nice and crisp. BE CAREFUL if you are using minky though because you should not directly iron minky. Iron depending on your fabric's needs. Or be like me, impatient and just head to the sewing machine.

Step Seven:
To the sewing machine!! Use your regular or walking foot and sew a straight stitch all the way around the blanket close to the edge where the cotton meets the minky. This assures you go through all the layers and your blanket is secure. If you'd like you can do an extra stitch along the OUTSIDE edge of the blanket, but you don't have to. I did not. IMPATIENT, remember?

Step Eight:
When you get to the corners, I generally go down the corner to the tip, turn around and go back down, resuming the straight stitch after turning the fabric where it needs to go. This is up to you and how you want your stitches to look.


Step Nine:
Continue this all around your blanket to secure all the corners. You should not backstitch with a walking foot, so if you used one, you may want to put your regular foot back on to secure your starting and stopping point. Note, I did not, because I'm impatient and the blanket is holding up just fine.

Step Ten:
Give to your favorite little person! :) You can mix this up with various fabric types. I've made some beautiful blankets with satin overlapping minky. Do remember when working with minky or satin or other slippery, stretchy fabrics, pinning or clipping is your friend, and walking foots help with layers!

Enjoy! Just keep swimming! :)
Materials:
Fabric 1 you want (I used minky)
Fabric 2 you want (I used cotton) The yardage is really up to you. You just want Fabric 2 to be larger than Fabric 1 by about 2-3 inches on all 4 edges if you lay them down (pics below).
Sewing Machine
Thread and usual sewing notions
Pins
Frosty Cold Drink (or Toasty Hot Drink if it's winter when you make this)
Helpful tip: If this blanket is for a child, you can usually get by with 1 yard of each of your fabrics, you'll just have to cut Fabric 1 smaller than Fabric 2 to do your overlap.
Step One:
Lay our your fabric. In my case, my cotton was my larger piece. Lay this piece out WRONG SIDE UP, completely spread out. Lay your smaller fabric (minky in my case) on top of the cotton RIGHT SIDE UP. Center it, almost like the cotton is a border around the minky.
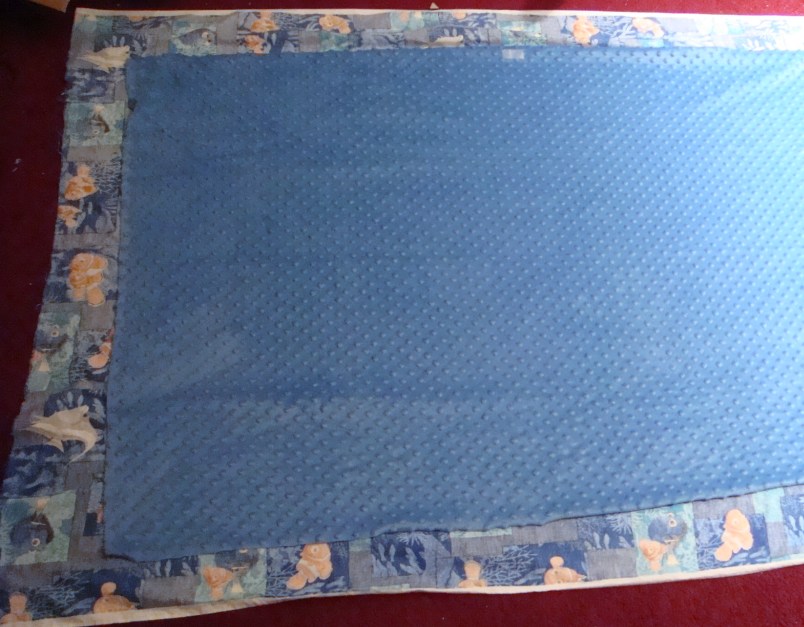
Step Two:
Be interrupted by your child.

Step Three:
Fold your cotton over once til it meets the edge of the minky. If you've gotten everything nice and centered this will go smoothly. You may have to cut some cotton if you have too much.

Step Four:
Fold the cotton again so it overlaps the minky and pin.

Step Five:
Continue this all the way around. When you get to the corners you can fold a sort of V, almost as if you were wrapping a package.


Step Six:
Now your cotton should be folded all around your minky on every edge and pinned. If you're really in the mood you can iron the overlap at this point to make it nice and crisp. BE CAREFUL if you are using minky though because you should not directly iron minky. Iron depending on your fabric's needs. Or be like me, impatient and just head to the sewing machine.

Step Seven:
To the sewing machine!! Use your regular or walking foot and sew a straight stitch all the way around the blanket close to the edge where the cotton meets the minky. This assures you go through all the layers and your blanket is secure. If you'd like you can do an extra stitch along the OUTSIDE edge of the blanket, but you don't have to. I did not. IMPATIENT, remember?

Step Eight:
When you get to the corners, I generally go down the corner to the tip, turn around and go back down, resuming the straight stitch after turning the fabric where it needs to go. This is up to you and how you want your stitches to look.


Step Nine:
Continue this all around your blanket to secure all the corners. You should not backstitch with a walking foot, so if you used one, you may want to put your regular foot back on to secure your starting and stopping point. Note, I did not, because I'm impatient and the blanket is holding up just fine.

Step Ten:
Give to your favorite little person! :) You can mix this up with various fabric types. I've made some beautiful blankets with satin overlapping minky. Do remember when working with minky or satin or other slippery, stretchy fabrics, pinning or clipping is your friend, and walking foots help with layers!

Enjoy! Just keep swimming! :)
Subscribe to:
Posts (Atom)
LinkWithin
