Showing posts with label craft how to. Show all posts

Thursday, March 8, 2012

EASY Ruffle Infinity Scarf--Sewing Tutorial


I stumbled across this fun ruffly fabric at Hancock's today and thought, hmm...I see a scarf! I also realized it has been far too long since I wrote a tutorial...so here you go!

I did not note the brand/name/sku of this fabric. I've not noticed it before, but the only way I can describe it is ruffly. My store had it in the middle racks (where they put the 'new' fabric they are trying to sell). It was 9.99 a yard but I had a 40% off coupon and lo and behold there was exactly one yard left on the bolt. There was white, pink, blues and grays. Very pretty colors.

Anyhoo, take your one yard and lay it out unfolded.

Decide how wide you want your scarf. I chose around 8 inches wide. Cut lengthwise to make strips of 8 inches (or your desired length). I got 5 strips out of the yard.


Put the right sides together of the end pieces and serge or sew them. I used a zig zag stitch since its more 'giving' than a straight stitch. Since this is a ruffly, messy scarf, it's not necessary everything be perfectly lined up and "perfect".

Decide if you want your scarf to be two strips long or three. If you chose three, repeat previous step til you have three strips sewn together at the ends. Then, check that the fabric isn't twisted, and right sides together, sew up the remaining "open" ends. This completes the infinity scarf!!

Seriously, it was that easy. Took me maybe ten minutes including cutting time and vacuuming up the floor prior to laying the fabric out!

Here is the "long" scarf..with three strips. (and my little helper)

Here is one that is just two strips, for a snugger scarf.


And that's that. An easy, quick, fun spring scarf!!
ENJOY!


Don't fee like making yours?? Find mine, ready to ship from my shop SeauxComfy!
~~Amy

Feel free to pin this tutorial, giving me credit! :)

Pin It

Friday, January 14, 2011

Impatient Craftaholic Series--Sewing a Scrunchie

Oops, I did it again, another video tutorial. I'm being a goof in this one but hope you like :) Yes, I still wear scrunchies. I realize they're not cool, but alas, I don't care. I can't STAND hair in my face!!
Enjoy!

Monday, August 2, 2010

Easy Blanket Tutorial--Impatient Craftaholic Series

Time for another tutorial! Let's make a nifty blanket!

Materials:

Fabric 1 you want (I used minky)
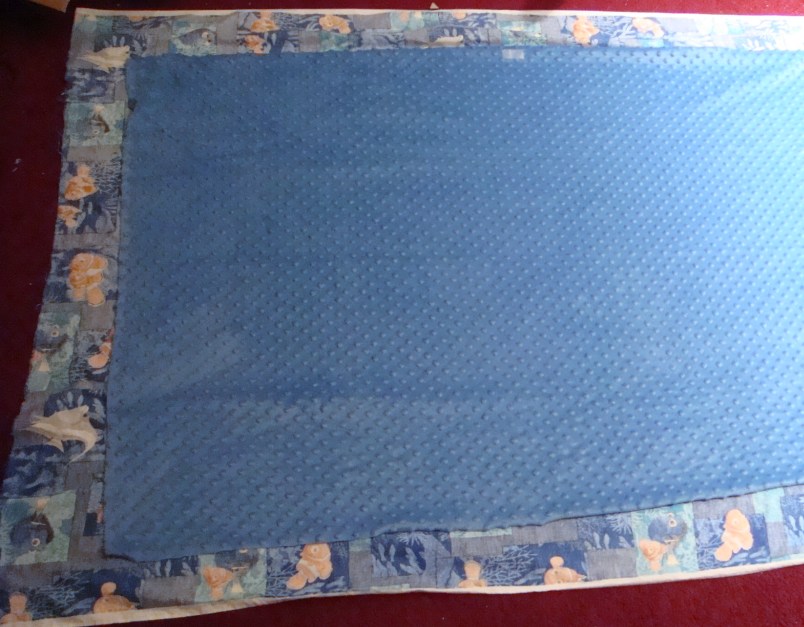
Fabric 2 you want (I used cotton) The yardage is really up to you. You just want Fabric 2 to be larger than Fabric 1 by about 2-3 inches on all 4 edges if you lay them down (pics below).
Sewing Machine
Thread and usual sewing notions
Pins
Frosty Cold Drink (or Toasty Hot Drink if it's winter when you make this)


Helpful tip: If this blanket is for a child, you can usually get by with 1 yard of each of your fabrics, you'll just have to cut Fabric 1 smaller than Fabric 2 to do your overlap.

Step One:
Lay our your fabric. In my case, my cotton was my larger piece. Lay this piece out WRONG SIDE UP, completely spread out. Lay your smaller fabric (minky in my case) on top of the cotton RIGHT SIDE UP. Center it, almost like the cotton is a border around the minky.


Step Two:
Be interrupted by your child.

Step Three:
Fold your cotton over once til it meets the edge of the minky. If you've gotten everything nice and centered this will go smoothly. You may have to cut some cotton if you have too much.


Step Four:

Fold the cotton again so it overlaps the minky and pin.

Step Five:

Continue this all the way around. When you get to the corners you can fold a sort of V, almost as if you were wrapping a package.


Step Six:
Now your cotton should be folded all around your minky on every edge and pinned. If you're really in the mood you can iron the overlap at this point to make it nice and crisp. BE CAREFUL if you are using minky though because you should not directly iron minky. Iron depending on your fabric's needs. Or be like me, impatient and just head to the sewing machine.


Step Seven:
To the sewing machine!! Use your regular or walking foot and sew a straight stitch all the way around the blanket close to the edge where the cotton meets the minky. This assures you go through all the layers and your blanket is secure. If you'd like you can do an extra stitch along the OUTSIDE edge of the blanket, but you don't have to. I did not. IMPATIENT, remember?


Step Eight:
When you get to the corners, I generally go down the corner to the tip, turn around and go back down, resuming the straight stitch after turning the fabric where it needs to go. This is up to you and how you want your stitches to look.


Step Nine:

Continue this all around your blanket to secure all the corners. You should not backstitch with a walking foot, so if you used one, you may want to put your regular foot back on to secure your starting and stopping point. Note, I did not, because I'm impatient and the blanket is holding up just fine.


Step Ten:
Give to your favorite little person! :) You can mix this up with various fabric types. I've made some beautiful blankets with satin overlapping minky. Do remember when working with minky or satin or other slippery, stretchy fabrics, pinning or clipping is your friend, and walking foots help with layers!


Enjoy! Just keep swimming! :)


Wednesday, July 28, 2010

Bath Salts Tutorial--Impatient Craftaholic Series

It's time to move my bath salts tutorial to this blog since my soap shop will be on an extended hiatus until I can catch up with life, kids, and shops :)

My Bath Salts Tutorial has been fairly popular though, so I want it to still be available to you all! Please let me know if this link does not work in any way.

BATH SALTS TUTORIAL


Thanks all, happy salting!
~~mama


LinkWithin

Related Posts with Thumbnails